 Open Mon - Fri   8:30am - 5:00pm
ABOUT   CONTACT    
FREE Shipping

Tag: AC compressor

Installation Tips for Your New Sanden AC Compressor

Proper installation of your Sanden AC compressor ensures efficient cooling and prolonged service life.

1. Pre-installation Checks: Confirm part compatibility with your car model, verify required tools (wrenches, torque wrench, vacuum pump, and refrigerant gauges), and check the compressor for transit damage.

2. System Cleaning and Flushing: Thoroughly flush your AC system to remove debris and contaminants that might affect compressor performance.

3. Compressor Installation: Securely mount the compressor following correct torque settings. Ensure proper lubrication with recommended compressor oil.

4. Testing and Charging: After installation, leak test the system, evacuate air and moisture, and recharge with the correct refrigerant amount. Follow Sanden’s specifications for optimal performance.

The Crucial Role of the TX Valve and AC Compressor in Your Vehicle’s Cooling System

Your vehicle’s air conditioning system plays an integral role in maintaining comfort on the road. Two of its important components, the TX (Thermal Expansion) valve and the AC compressor, are critical for regulating the cooling process and ensuring that your car’s cabin stays at a comfortable temperature. Understanding how these components function, the common issues that can arise, and the maintenance steps required will help you keep your AC system in top condition and avoid costly repairs.

What is a TX Valve, and Why is it Important?

The TX valve, or thermal expansion valve, is responsible for controlling the amount of refrigerant entering the evaporator. By adjusting the flow based on the air temperature inside the cabin, the TX valve maintains a balanced cooling effect. When functioning correctly, the TX valve ensures efficient temperature regulation, reduced strain on the AC system, and extended compressor life.

Key Functions of the TX Valve

  • Regulates Refrigerant Flow: The TX valve ensures the right amount of refrigerant is delivered to the evaporator.
  • Maintains Consistent Temperature: By controlling the flow, the TX valve helps maintain a stable cabin temperature.
  • Improves Efficiency: A properly working TX valve helps the entire AC system function more efficiently.

The Role of the AC Compressor in Vehicle Cooling

The AC compressor is often referred to as the “heart” of the AC system. It pressurises and circulates refrigerant, allowing heat to be released and cool air to flow through the cabin. Without a properly functioning compressor, the AC system cannot produce cold air, making it essential to identify and address compressor issues early.

Key Functions of the AC Compressor in Car Conditioning

  • Circulates Refrigerant: The compressor pumps refrigerant through the system to produce cooling.
  • Pressurises Refrigerant: Compressing refrigerant gas enables the cooling process.
  • Ensures Cooling Consistency: A healthy compressor maintains a steady cooling effect inside the vehicle.

Common Signs of TX Valve and Compressor Failure

Both the TX valve and the AC compressor can experience wear over time, leading to diminished performance or even system failure. Recognising the signs early can help you avoid complete AC breakdowns and maintain comfort.

Symptoms of TX Valve Issues

  • Inconsistent Cooling: If the TX valve malfunctions, you may notice inconsistent cabin temperatures.
  • Frost on the AC Evaporator: A faulty TX valve may cause refrigerant to freese on the evaporator, affecting cooling performance.
  • Unusual Noises: Hissing sounds may indicate that the TX valve isn’t properly regulating refrigerant flow.

Symptoms of Compressor Failure

  • Warm Air: If the AC only blows warm air, it’s likely a compressor issue.
  • Loud Noises: Grinding or squealing noises can signify a failing compressor.
  • Oil Leaks: Leaks around the compressor may indicate internal damage.

How to Maintain Your Vehicle’s TX Valve and AC Compressor in car

Routine maintenance can extend the life of your vehicle’s TX valve and compressor, ensuring efficient cooling and preventing costly repairs.

Steps to Maintain the TX Valve

  1. Check Refrigerant Levels: Low refrigerant can lead to TX valve issues.
  2. Inspect for Frost Buildup: Frost around the valve indicates an imbalance that needs attention.
  3. Monitor Cooling Efficiency: If you notice changes in cooling performance, have the TX valve inspected.

Steps to Maintain the AC Compressor

  1. Run the AC Regularly: Running the AC periodically, even in winter, keeps the compressor lubricated.
  2. Check for Refrigerant Leaks: Low refrigerant stresses the compressor, so fix any leaks promptly.
  3. Schedule Regular Inspections: Have a professional inspect the AC system annually to catch any early signs of compressor wear.

Replacing the TX Valve and AC Compressor: When is it Necessary?

While regular maintenance can prolong the lifespan of the TX valve and compressor, these components may need replacement over time. Knowing when to replace them can save you from unexpected breakdowns and discomfort.

  • TX Valve Replacement: If you experience consistent cooling issues, frost buildup, or hissing sounds, it may be time to replace the TX valve. A professional inspection can confirm if replacement is necessary.
  • AC Compressor Replacement: When the compressor fails to blow cold air or emits unusual sounds, a replacement may be the best solution. Professional repair can be costly, but a new compressor can improve cooling efficiency significantly.

FAQs about the TX Valve and AC Compressor in Cars

1. How can I tell if my TX valve needs replacement?

If your AC is blowing warm air or you find frost on the evaporator, the TX valve may need replacing. A professional inspection will confirm this.

2. Can I drive with a failing AC compressor?

While technically possible, driving with a failing compressor can affect other AC components and may lead to costly repairs.

3. Is TX valve repair expensive?

Repair costs vary, but addressing issues early on can save money by avoiding full system breakdowns.

Expert Advice: Choosing Quality Parts for TX Valve and Compressor Replacement

When replacing the TX valve or compressor, quality parts ensure optimal performance and durability. Invest in trusted brands or OEM parts to get the best results. Consult a qualified technician for recommendations tailored to your vehicle’s make and model.

Ensure Maintaining a Healthy TX Valve and AC Compressor for Comfortable Drives

The TX valve and AC compressor are fundamental to your vehicle’s cooling system. By understanding their roles, recognising signs of failure, and following maintenance tips, you can ensure a comfortable, efficient ride in all seasons. Routine care and prompt attention to any issues will keep your AC running smoothly and prevent the need for costly repairs.

Known Reasons for an A/C Compressor to fail with bonus installation tips

A Compressor can fail on its own, however in some cases a failed Compressor is caused because of an underlying issue. A few steps can dramatically reduce the chances of a failed compressor recurring. It is important to follow manufacturer’s installation procedures. In most circumstances failing to do so will void the manufacturer’s warranty. When working on A/C systems please follow all State and Federal legislation.

If your Compressor has failed, please check the following for possible causes before installing your new unit.

1. Has the A/C system had been undercharged or overcharged with refrigerant? An undercharged system will cause insufficient oil circulation throughout the A/C loop causing insufficient Compressor lubrication. Think of your A/C Compressor is the engine for your air conditioning, any engine will fail without adequate oil. Your A/C Compressor is no different. If the system has been overcharged with refrigerant this can cause excess pressure to 

Develop in the compressor, this excessive pressure can shorten a Compressors service life. This is rare on a factory fitted compressor but can occur when serviced by an unqualified persons. 

2. Excessive Refrigerant Oil Charge in system.  Excessive Refrigerant oil can cause “liquid slugging” inside the Compressor. This is very unlikely to have happened on a factory fitted compressor. Liquid slugging refers to a concentration of oil building up in the compressor and cannot pass through freely causing internal damage to occur. This is more likely to happen if oil has been injected directly into the low side charging port or directly into the compressor itself. It is always advisable to inject oil into the high side charging port only. If fitting a new Compressor attaching both A/C lines, rotate Clutch Hub a minimum 8-10 times to minimise any chance of liquid slugging upon initial start-up.) This will prevent the oil from being concentrated in one area and drastically reduce the chance of liquid slugging occurring. 

3.  When installing a Compressor  refer to the vehicle manufacturer’s specifications to determine correct oil type and charge rate. This can usually be found through the Vehicles service manual or a decal located under the bonnet. Using the wrong type or amount of compressor oil can drastically shorten a compressors life span. Compressors do come pre charged with oil although it is advisable to compare to vehicle manufacturers recommendations.

4. Contaminated oil. Compressors are high pressure pumps and have internal moving parts. When a Compressor wears over time it can create fine metal particles that mix in with the oil and flow throughout the A/C system. This in turn causes further Compressor wear.  This is the main cause of premature compressor failure. If upon removal it is found the Compressor oil is not clean the A/C system must be flushed with approved A/C flushing solvent to remove any contamination before fitting the new compressor or cross contamination will occur and damage to the new Compressor will likely result. All flushing solvent must be removed from the A/C system or allow enough length of time for the solvent to boil off under atmospheric pressure. Never flush through a TX Valve or Receiver/Drier. These must be removed prior to flushing. Parallel or Multi flow condensers cannot be flushed and must be replaced. Condensers cannot be flushed as flushing solvent will only follow the path of least restriction and will not clean the whole condenser. 

5. Air or moisture in the A/C system can be caused by poor service techniques. Moisture can cause a reaction to occur and the oil to develop into a sludge like substance. If the system is opened and exposed to the atmosphere for more than 15 minutes moisture will penetrate the A/C system and the Receiver/Drier must be replaced.

6. Although uncommon in all but older vehicles another known reason for a Compressor to fail is a term referred to as Black Death. Black death occurs when impurities are present within the air conditioning system due to a failed Receiver/Drier. These contain desiccant particles, over time this desiccant can break down and travel throughout the A/C System. Always replace Receiver/Drier when fitting a new Compressor.

7. Only Use New refrigerant your Compressor was designed for. In most cases this will be R134a on newer model vehicles it may be R1234yf. Do not use Minus 30 – HyChill or any other substitute refrigerant. This substitute refrigerant has not been approved by any Compressor manufacturer. Evacuate for a minimum of a minimum of 30 minutes before recharging with refrigerant.  

8. Check for loose Compressor bolts nuts, drive belts or mountings. 

9.  Make sure the Vehicle’s electrical system voltage is not below 9 volts. This is the minimum voltage needed for a clutch coil to operate correctly.

Things to know about an A/C Compressor

Things to know about an A/C Compressor

Auto Air Conditioning System

The air conditioning system in your car performs the vital role of cooling the air temperature in the cabin of your vehicle. Your A/C System should be checked and serviced every two years. Regular servicing of your A/C system will ensure optimal performance and could potentially save repair costs further down the track.

A basic rundown of how the A/C Compressor works

Your car’s air conditioning compressor is driven by the engine using a belt. Its function is to transport the refrigerant into the system. The refrigerant is subsequently sucked in as a gas at low pressure and then compressed to raise the temperature. From there, it is transferred to the condenser in the form of air with increased heat and force. The liquid becomes very cold as it leaves the condenser and returns to its natural gaseous state.

Effects of a Malfunctioning compressor

Reduced efficiency in your cars A/C System is often caused by a leak in the system, particularly in the A/C hoses. This is one of the most common reasons for an underperforming system. Low levels of refrigerant are responsible for reduced efficiency of the air conditioning system. Poor airflow due to an underperforming fan, blockage or debris in the A/C Condenser can also reduce the efficiency of the cooling in your A/C System. It is important to check the condenser for obstructions or damage. Regular maintenance can help reduce the need for repairs in the future.

Other common causes of a malfunctioning A/C compressor include a faulty magnetic Clutch. This is an extremely common fault which will stop an A/C Compressor from working. A defective Compressor control valve is also another common fault in many A/C Compressors. This can usually be determined by gauge readings.

AC compressor

Continue reading

How to Buy a Good Quality AC Compressor

Motorists have enjoyed the benefits of Vehicle Air Conditioning as far back as the late 1930s when the Packard Motor Car Company introduced the former luxury feature as an option in consumer vehicles. Today Air Conditioning is standard on virtually every make and model of vehicle.

The air conditioner compressor works by compressing refrigerant to be distributed throughout the air conditioning system. When your car’s AC isn’t working correctly it’s often one of two issues – low refrigerant ( possibly due to a leak ) or a faulty compressor. If the refrigerant level is sufficient, the second most common cause is the compressor.

AC compressors may experience external failure or internal failure. External failure happens because of a defective clutch or pulley, or a refrigerant leak. This is the easier type of problem to fix. Internal failure can be detected by the presence of metal bits or flakes around the compressor. This type of damage can spread throughout the entire A/C system. In the event of internal failure, it’s usually necessary to replace the whole compressor.

How to make sure you’re getting a good quality AC compressor:

Steer away from second hand if it can be avoided. Quite often a used Compressor has done many thousands of km’s and there is a good chance it may fail in the not-so-distant future. We strongly recommend all replacement AC parts used should be new, preferably genuine. With OEM you’re paying a little more, but you know you’re getting a part that fits perfectly and is manufactured to the highest of standards. Alternatively, there are good aftermarket alternatives available on the market for many Compressor models. Please contact us to discuss which options would best suit your specific needs.

Replacing the AC compressor is within itself usually not a difficult job, however, depending on access it can be time-consuming.  When fitting a new AC Compressor all the O-Ring seals should be placed.

A/C Compressor Clutch Replacement Procedure

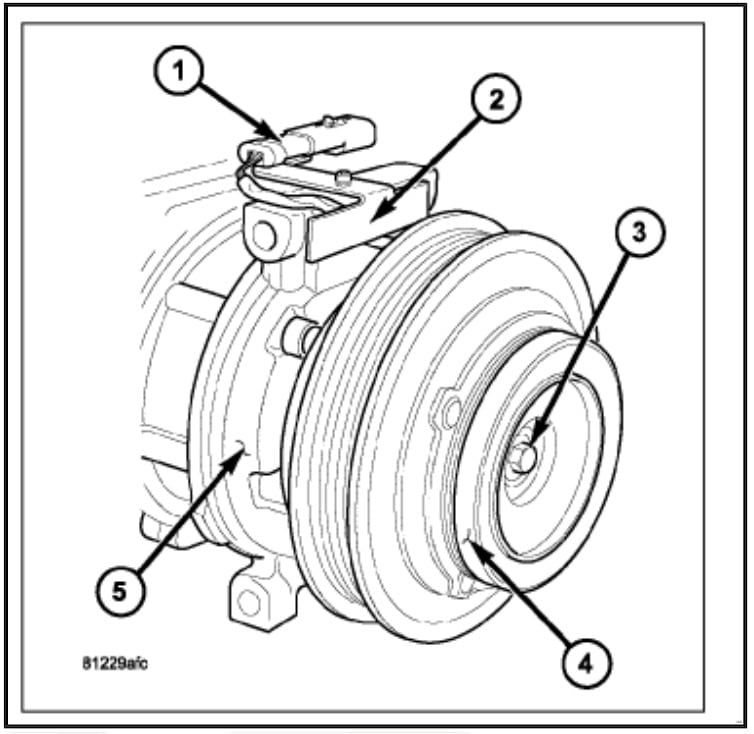
  • A typical A/C compressor is shown in illustrations.

1. Disconnect and isolate the negative battery cable.
2. Remove the accessory drive belt.
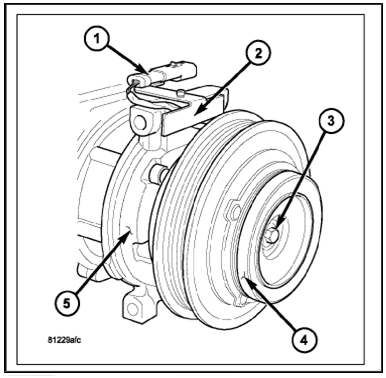
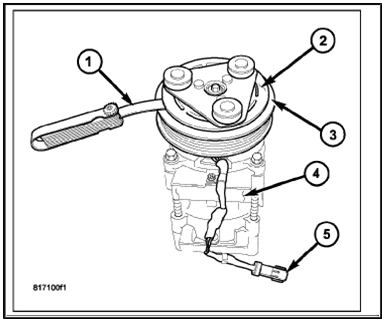
3. Disconnect the engine wire harness from the A/C compressor clutch field coil connector (1) located on the top of the A/C compressor (5).
4. Remove the bolts that secure the A/C compressor to the engine and support the A/C compressor.
5. Carefully remove the compressor clutch field coil connector and wire lead from the connector bracket (2).
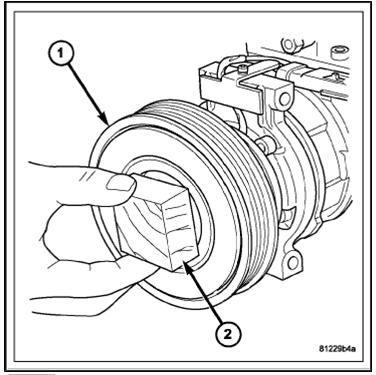
6. Remove the compressor shaft bolt (3). A band-type oil filter wrench or a strap wrench may be used to hold the clutch plate (4) from rotating during bolt removal.

CAUTION: Do not pry between the clutch plate and the pulley and bearing assembly to remove the clutch plate from the compressor shaft as this may damage the clutch plate.

NOTE: Use care not to lose any clutch shim(s) during the removal of the clutch plate, as they may be reused during the clutch plate installation process.

A/c Compressor Clutch 1

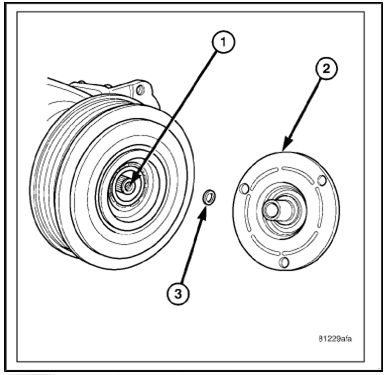
7. Tap the clutch plate (2) lightly with a plastic mallet to release it from the splines on the compressor shaft (1) and remove the clutch plate and shim(s) (3).

A/c Compressor Clutch 2

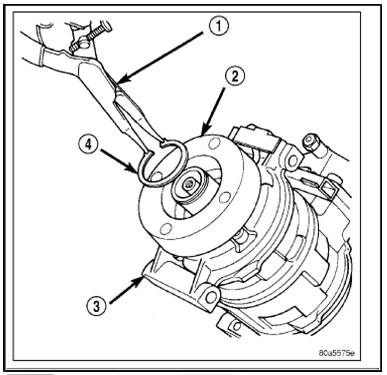
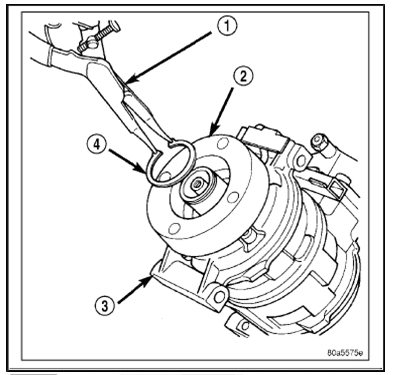
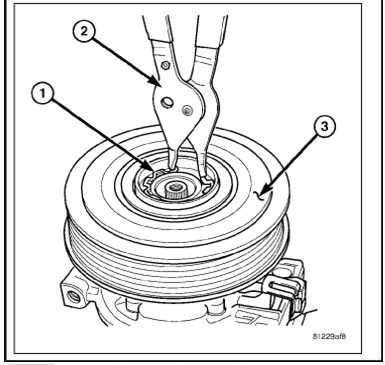
8. Using snap ring pliers (2), remove the snap ring (1) that secures the pulley and bearing assembly (3) to the front of the A/C compressor and remove the pulley and bearing assembly.

A/c Compressor Clutch 3

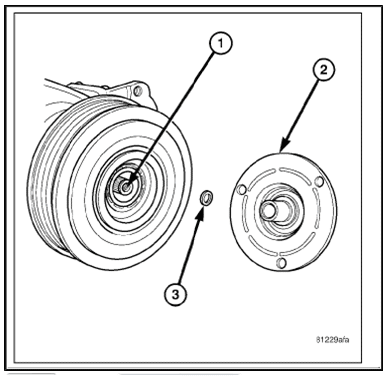
9. Using snap ring pliers (1), remove the snap ring (4) that secures the compressor clutch field coil (2) to the front of the A/C compressor (3) and remove the field coil.

INSTALLATION

NOTE: Typical A/C compressor is shown in illustrations.

A/c Compressor Clutch 4

1. Align the dowel pin on the back of the compressor clutch field coil (2) with the hole in the front of the A/C compressor (3) and position the field coil onto the compressor. Be certain that the compressor clutch field coil wire lead is properly routed so that it is not pinched between the A/C compressor and the field coil.

CAUTION: The snap ring must be installed and seated into the groove or it will vibrate out, resulting in a clutch failure and severe damage to the A/C compressor. Lock the snap ring back into its seating position, securing the compressor clutch field coil to the A/C compressor. The bevel side of the snap ring must face outward and both snap ring eyelets must be oriented to the right or to the left of the field coil dowel pin location on the A/C compressor.

2. Using snap ring pliers install the snap ring (4) that secures the compressor clutch
field coil to the front of the A/C compressor. Check that the snap ring is seated within the groove and oriented correctly.

  • Be certain to position the compressor clutch field coil wire lead so that it is not damaged during A/C compressor pulley and bearing installation.
  • When installing the pulley and bearing assembly, DO NOT mar the friction surfaces of the pulley or premature failure of the clutch will result.
A/c Compressor Clutch 5

3. Install the pulley and bearing assembly (1) onto the front of the A/C compressor. If necessary, tap the pulley gently with a block of wood (2) placed on the pulley friction surface.

CAUTION: The snap ring must be fully and properly seated in the groove or it will vibrate out, resulting in a clutch failure and severe damage to the A/C compressor. The bevel side of the snap ring must face outward.

A/c Compressor Clutch 6

4. Using snap ring pliers (2), install the snap ring (1) that secures the pulley and bearing assembly (3) to the front of the A/C compressor. Be certain that the snap ring is fully and properly seated in the groove.

A/c Compressor Clutch 7

5. If the original clutch plate (2) and pulley and bearing assembly are to be reused, reinstall the original shim(s) onto the compressor shaft (1). If a new clutch plate and pulley and bearing assembly are being used, install a trial stack of shims 2.54 mm (0.010 in.) thick onto the compressor shaft.

A/c Compressor Clutch 8

6. Install the clutch plate (4) onto the front of the A/C compressor (5).
7. Install the compressor shaft bolt (3). Tighten the bolt to 19 N.m (168 in.lbs.)

  • The shims may compress after tightening the shaft bolt. Check the air gap in four or more places to verify the air gap is correct. Spin the pulley before performing a final check of the air gap.
  • On models with the clutch plate recessed into the pulley, use a 90-degree wire gap gauge to measure the clutch air gap. On other models, use a blade-type feeler gauge to measure the air gap.

8. With the clutch plate assembled tight against the shim(s), measure the air gap between the clutch plate and the pulley and bearing assembly. The air gap should be between 0.35 – 0.60 mm (0.014 – 0.024 in.). If the air gap is not between specifications, add or subtract shims as needed until the correct air gap is obtained.

CAUTION: Be certain that the compressor clutch field coil wire harness is properly routed so that it is not pinched between the A/C compressor and the field coil connector bracket.

9. Carefully route the compressor clutch field coil wire lead behind the connector bracket (2).
10. Install the compressor clutch field coil connector (1) onto the connector bracket.
11. Position the A/C compressor to the engine and install the retaining bolts.
12. Connect the engine wire harness to the compressor clutch field coil connector.
13. Install the accessory drive belt.
14. Reconnect the negative battery cable.

VISTEON STYLE COMPRESSOR

REMOVAL

NOTE: If the A/C compressor clutch can be serviced in the vehicle, the refrigerant system can remain fully charged during compressor clutch, pulley and bearing assembly or field coil replacement.

A/c Compressor Clutch 10

1. Disconnect and isolate the negative battery cable.
2. Remove the accessory drive belt.
3. Raise and support the vehicle.
4. Disconnect the engine wire harness from the clutch field coil connector (4).
5. Remove the bolts that secure the A/C compressor (5) to the mounting bracket.
6. Remove the A/C compressor from the mounting bracket and support the compressor while servicing the clutch.
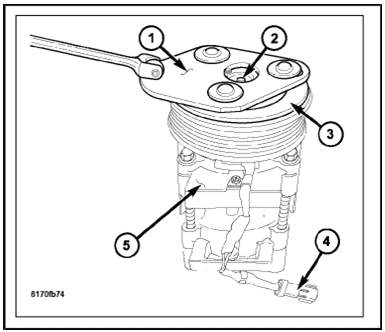
7. Using compressor clutch holding fixture (1), remove the bolt (2) that secures the clutch plate (3) to the compressor shaft.

  • The clutch plate can be removed from the compressor shaft by hand or, if required, pressed off with an 8 x 1.25 mm bolt.
  • Clutch plate shim(s) may remain inside the hub of the clutch plate. Be sure to remove all of the shims from inside the hub or from the end of the compressor shaft.
A/c Compressor Clutch 11

8. Remove the clutch plate and shim(s) from the A/C compressor. If required, install an 8 x 1.25 mm bolt into the centre of the clutch plate and turn the bolt clockwise until the clutch plate is completely removed from the A/C compressor.
9. Using snap ring pliers (1), remove the snap ring (2) that secures the pulley and bearing assembly (3) to the front of the A/C compressor (4).

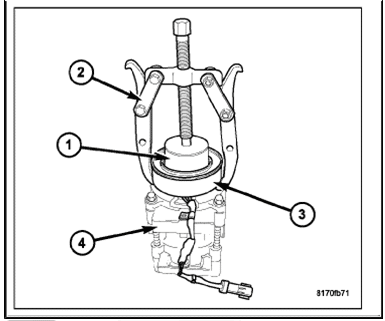
NOTE: The pulley and bearing assembly can be removed from the compressor by hand or, if required, with a two-jaw puller.

A/c Compressor Clutch 12

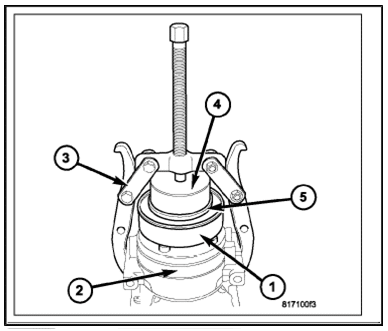
10. Remove the pulley and bearing assembly (1) from the front of the A/C compressor (2). If required, install a two jaw puller (3) and turn the puller centre-bolt clockwise until the pulley and bearing assembly are completely removed.
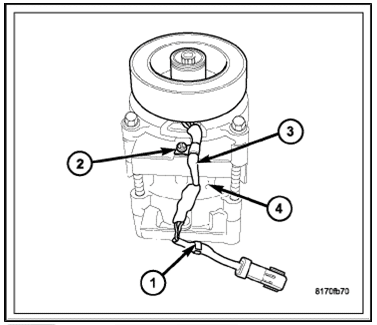
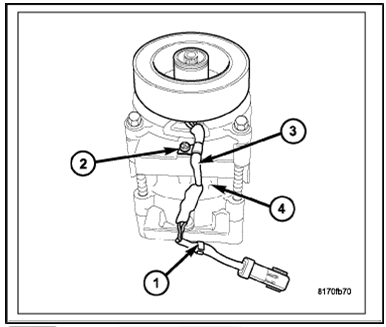
11. Remove the plastic retaining clip (1) and the screw (2) that secures the clutch field coil wire lead and connector (3) to the A/C compressor (4).

A/c Compressor Clutch 13

12. Using compressor field coil remover tool (1) and a two jaw puller (2), remove the clutch field coil (3) from the front of the A/C compressor (4).

INSTALLATION

A/c Compressor Clutch 14

1. Position the A/C clutch field coil (1) squarely onto the front of the A/C compressor (2).

CAUTION: Position the A/C clutch field coil so that the coil positioning tabs and the wire harness lead are oriented in the correct direction. Failure to correctly position the field coil on the A/C compressor will result in field coil damage.

2. Align the field coil positioning tabs to the recessed area at the front of the A/C compressor and install the clutch field coil onto the compressor using a two jaw puller (3), compressor field coil installer tool (4) and the compressor field coil installer spacer (5)

A/c Compressor Clutch 15

3. Position the clutch field coil wire lead and connector (3) to the A/C compressor (4) and install the plastic retaining clip (1) and the screw (2) that secures the wire lead to the compressor. Tighten the screw to 4 N.m (35 in. lbs.).

A/c Compressor Clutch 16

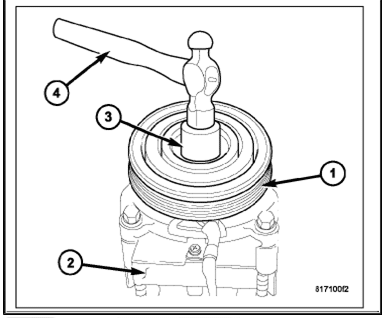
4. Align the pulley and bearing assembly (1) squarely onto the front of the A/C compressor (2).

NOTE: A distinct change of sound during the clutch pulley tapping process indicates that the pulley and bearing assembly has bottomed out against the compressor housing.

5. Using a clutch pulley installation tool (3) and a small plastic or rubber hammer (4), install the pulley and bearing assembly onto the front of the A/C compressor. Tap the installer with a hammer until the pulley and bearing assembly has bottomed against the compressor housing.

CAUTION: If the snap ring is not fully seated in the groove it will vibrate out, resulting in clutch failure and severe damage to the A/C compressor.

NOTE: Install the snap ring with the beveled side of the snap ring facing outward.

A/c Compressor Clutch 17

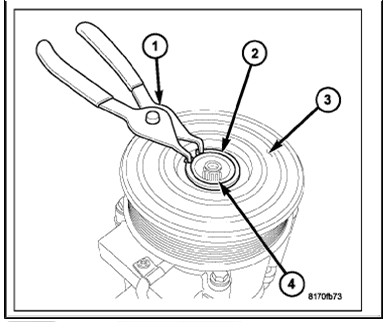
6. Using snap ring pliers (1), install the snap ring (2) that secures the pulley and bearing assembly (3) to the front of the A/C compressor (4). Make sure the snap ring is properly seated in the groove.

A/c Compressor Clutch 18

7. Verify that there is adequate clearance for the clutch field coil wire lead and connector (4) between the compressor housing and the pulley.

NOTE: When installing an original or a new clutch assembly, try the original shims first. When installing a clutch onto a compressor that previously did not have a clutch, use the 1.0, 0.50 and 0.13 millimeter (0.040, 0.020 and 0.005 inch) shims from the clutch hardware package which is provided with the new clutch.

8. Install the clutch shims onto the compressor shaft.
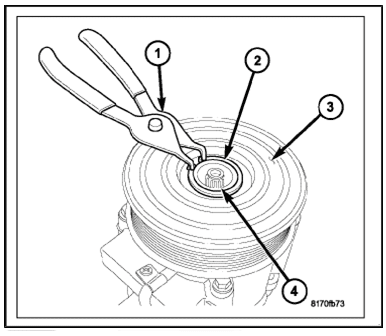
9. Using a A/C compressor clutch holding fixture tool (1), install the bolt (2) that secures the clutch plate (3) to the A/C compressor (5). Hold the clutch plate stationary with the holding fixture and tighten the bolt to 15 N.m (133 in. lbs.)

A/c Compressor Clutch 19

10. Using a feeler gauge (1), check the air gap between the clutch plate (2) and the pulley and bearing assembly (3). If the air gap is not 0.35 to 0.75 millimeter (0.014 to 0.030 inch), add or subtract shims as required.
11. Position the A/C compressor (4) onto the mounting bracket.
12. Install the bolts that secure the A/C compressor to the mounting bracket. Tighten the bolts to 23 N.m (17 ft. lbs.).
13. Connect the engine wire harness to the compressor clutch field coil connector (5).
14. Lower the vehicle.
15. Install the accessory drive belt.
16. Reconnect the negative battery cable.
17. Perform the Clutch Break-in Procedure.

Why You Should Hire Professional Experts for Repair of Your Car Air Conditioning

All equipment requires maintenance after a certain period of use. Your car AC is no different. It is one of the vital features of the car that ensures your journey in the car is as comfortable as ever. There is no point in keeping your car AC running if it starts giving problems. Minor issues can erupt into serious problems causing more damage to the vehicle and a greater outlay of funds for repair. 

At such times it is always best to get your car’s air conditioning repaired by professional experts.

What are the components that may need repair?

5 main components help to keep your car cool in hot summers and warm in chilly winters. They are: 

Why do you need to hire professional experts for repair?

Expertise and experience

Professional experts have the requisite expertise and experience to fix your issue promptly and efficiently. Diagnosis of the problem is accurate. They know exactly whether there is an issue with your car’s ac compressor oil or any other. 

Usage of top-quality car aircon parts

If there is a need to change any air conditioning auto parts, you are sure only the top quality car aircon parts will be used by professional experts. It gives you peace of mind knowing that your car is in good hands.

Customised service

The convenience of customised service cannot be denied, especially in times of specific needs. For example, you can sort out the issue of car aircon regas if you hire a professional repair service in Campbelltown. The experts ensure that all your needs are fulfilled to your satisfaction.

Quality service

The professional repair service has the latest equipment and tools to fix your issues. You are assured of top quality service from them, and this ensures that any issue regarding your ac condenser, ac compressor, tx valve, or any other part is sorted the first time around.

Satisfaction

Satisfaction is guaranteed if you hand your car to professional experts as they do not compromise on their services and ensure to resolve your problem to your satisfaction.

Before the advent of summer, ensure that your car AC is working in tip-top condition!  

The Function of an AC Compressor in a Car’s Air Conditioning System

The air conditioning (AC) system in a car plays a vital role in keeping the interior of the vehicle comfortable and cool, especially during hot summer months. One of the key components of the AC system is the compressor, which is responsible for circulating the refrigerant throughout the system and helping to cool the air inside the car.

The AC compressor is typically driven by the engine via a belt and pulley system and is located at the front of the engine. When the AC system is turned on, the compressor starts to run and begins to pressurise the refrigerant, which is typically a type of refrigerant gas such as R-134a.

As the refrigerant is pressurised, it becomes hot and is sent to the condenser, which is a radiator-like component located in front of the engine. The condenser helps to cool the refrigerant and convert it from a gas back into a liquid.

From the condenser, the refrigerant is sent to the evaporator, which is located inside the car. The evaporator is responsible for absorbing heat from the air inside the car and transferring it to the refrigerant, which helps to cool the air.

As the refrigerant absorbs heat from the air, it vaporises and turns back into a gas. The cooled, pressurised gas is then sent back to the compressor to start the process over again.

In addition to circulating and pressurising the refrigerant, the AC compressor also plays a crucial role in regulating the flow of refrigerant throughout the system. It does this through the use of a pressure switch, which helps to ensure that the system is operating at the correct pressure levels. If the pressure becomes too high or too low, the pressure switch will turn the compressor off to prevent damage to the system.

In summary, the car air conditioner compressor is a vital component of a car’s air conditioning system. It is responsible for circulating and pressurising the refrigerant, and it helps to regulate the flow of refrigerant throughout the system. When it comes to maintaining your car AC parts, Cool Car Air Conditioning in Australia specialises in providing efficient and effective services. To know more about them you can visit their website www.coolcarairconditioning.com.au or contact them at 0246665497. 

Is Your Car AC Compressor Causing a Power Drain? Here’s How to Check

When you turn on your car’s air conditioning, you expect it to cool the cabin and provide you with comfort during hot summer days. But what if you notice that your car’s performance seems sluggish or that the battery is draining faster than usual? This could be a sign that your car AC compressor is causing a power drain. In this blog, we will discuss the common causes of power drain caused by the AC compressor and how to check if your AC compressor is the culprit.


The car’s AC compressor is responsible for pressurizing the refrigerant and circulating it through the AC system. When the compressor fails, it can lead to poor AC performance or even a complete AC system failure. But did you know that a failing AC compressor can also cause a power drain?
There are several reasons why a car AC compressor can cause a power drain. One of the most common reasons is a failed clutch. The clutch is responsible for engaging and disengaging the compressor as needed. If the clutch fails, the compressor can stay engaged even when it’s not needed, causing a constant power drain.


Another reason for a power drain is a leak in the AC system. When the refrigerant leaks, the compressor has to work harder to pressurize and circulate the refrigerant, which leads to increased power consumption. Additionally, if the refrigerant level is low, the compressor may run continuously, causing a power drain.


So, how can you check if your car AC compressor is causing a power drain? The first thing to do is to observe your car’s behavior when the AC is turned on. If you notice that the car’s performance is sluggish, or the battery is draining faster than usual, turn off the AC and observe if the performance improves. If the performance improves, it’s likely that the AC compressor is causing a power drain.


You can also check the AC system’s pressure using a gauge. If the pressure is too low, it could be a sign of a refrigerant leak, which can cause a power drain. Additionally, you can check the compressor’s clutch by inspecting it for wear or damage. If the clutch is damaged, it may not be engaging and disengaging properly, causing a power drain.


If you suspect that your car’s AC compressor is causing a power drain, it’s best to take your car to a qualified mechanic for a proper diagnosis. The mechanic can inspect the AC system and determine the cause of the power drain. In some cases, a simple repair or a refrigerant recharge may be all that’s needed to restore the AC system’s performance and eliminate the power drain.


In conclusion, a failing car AC compressor can cause more than just poor AC performance. It can also cause a power drain that affects your car’s overall performance. If you notice that your car’s battery is draining faster than usual, or the performance seems sluggish, it’s important to check the AC system and have it inspected by a qualified mechanic. A little bit of preventive maintenance can go a long way in ensuring that your car’s AC system runs smoothly and efficiently.

Contact Cool Car Air Conditioning for a quote and friendly advice.

0
    0
    Your Cart
    Your cart is emptyReturn to Shop
      Calculate Shipping